Product
The product list holds every item you buy, stock or sell. Each product has a header (name, code, status) and 14 tabs for its units, barcodes, suppliers, prices, locations, grouping and more. Saving a product does not change stock: stock only moves through transactions (receiving, sales, deliveries, adjustments).
Menu: Data › Product
Decide two things for each product before its first transaction, because most changes to them are blocked once the product has been used: its Management Type (plain quantity, serial numbers or batches) and its Product Grouping type (whether it's made of other products). They are explained with examples in Management types and Product grouping types.
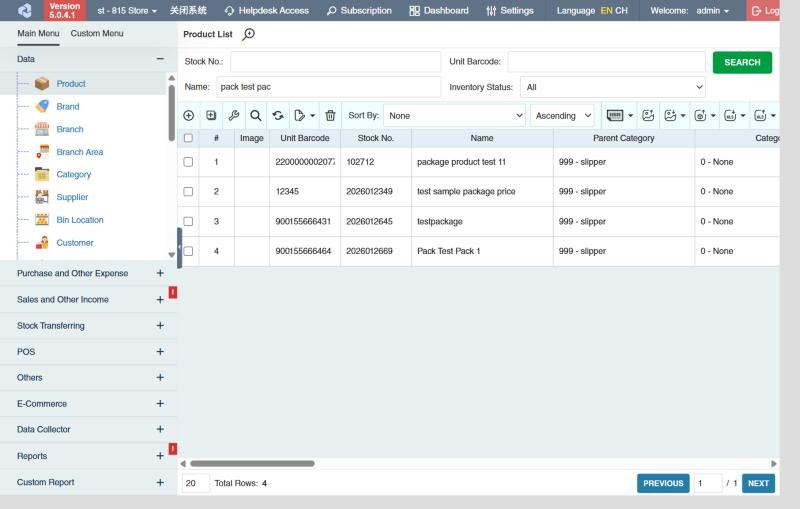
The product list
The top of the list has quick filters: Stock No., Unit Barcode, Name and Inventory Status (for example only products with negative stock). Click SEARCH to load the list. For the other filters, sorting and column settings, see Working with lists.
The toolbar has:
| Button | What it does |
|---|---|
| ⊕ Add New Product | Opens a blank product screen. |
| Add New Product (Express) | Opens a grid for adding many products quickly, one row each, with only the main fields. |
| Bulk Edit | Changes one field on all ticked products at once: Supplier, Product Memo, Description, Brand, Vatable, Category, Product Tag, Product Status, Senior or Branch Remarks. |
| Bulk Delete | Deletes the ticked products. Products with stock, pending transactions, or that are a component of a group can't be deleted; the reasons are listed in Delete Product Logs. |
| Barcode Print | Prints barcode stickers for the ticked products (Setup Sticker Size sets the label size). See also Barcode Printing. |
| Upload Product Image / Download Product Image | Adds photos in bulk (the file name must be the product's Barcode or Stock No., as chosen in Based On), or downloads the ticked products' photos. |
| Update Product Details | Updates existing products from Excel. See How to update many products from Excel. |
| Import | Adds new products from Excel. |
| Export List / Export to CSV | Exports the list as it's shown (with your column settings). |
Useful columns you can switch on in the list include Inventory, Reserved Qty, Avail. Inv, Requested Qty, Projected Inventory (see Stock figures), each price with its profit and markup, Min / Max, and the last purchase, delivery and sale dates (Last PI Date, Last TI Date, Last SO Date, Last POS Date).
Click the underlined Inventory figure of a product to open its Product Summary in a new tab.
How to add a product
- Open Data › Product and click ⊕ (Add New Product).
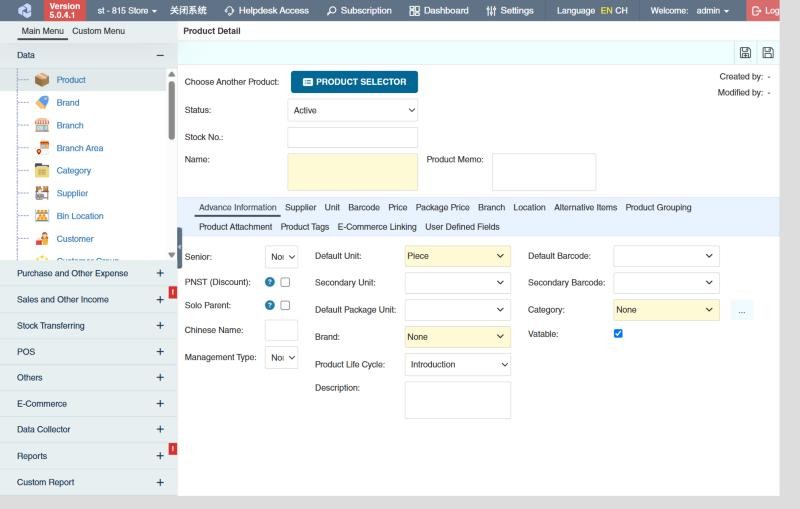
- Fill in the header (see The header). To copy an existing product's details, click Product Selector next to Choose Another Product and pick it.
- On the Advance Information tab, fill in at least Default Unit, Brand and Category (the yellow fields), and choose the Management Type.
- Add the prices on the Price tab, and the other tabs you need (each is described below).
- Click 💾 (Save), or Save and Add New to start the next product straight away.
Example. A grocery adds Nescafé Classic 50 g: Default Unit PC, Brand Nescafé, Category Coffee, Management Type Normal, Vatable ticked. On the Unit tab it adds the unit BOX with Qty 24 (one box holds 24 pieces), and on the Barcode tab the piece barcode and the box barcode. On the Price tab it enters a purchase price of 95.00 and a retail price of 120.00 for the main branch, and sets every other branch's Copy From to the main branch.
The header
| Field | What to enter |
|---|---|
| Status | Active, Inactive or Discontinued. Product selectors in transactions show only Active products unless the user changes the Status filter, so set products you no longer sell to Inactive or Discontinued instead of deleting them. The status of a product that is a component of a group can't be changed. |
| Stock No. | Your internal product code. Leave it blank and CIRMS gives the next number when you save. |
| Name | The product name (required), on one line. |
| Product Memo | Internal notes, shown in the product list and selector. |
| Created by / Modified by | Who created and last changed the product, and when (filled in by CIRMS). |
The product tabs
Advance Information
| Field | What it's for |
|---|---|
| Senior | The senior citizen / PWD discount at the POS: Non-Senior, Senior 20% (20% discount, for most goods) or Senior 5% (5% discount, for basic necessities and prime commodities). |
| PNST (Discount) | Tick if the product can get the discount for national athletes and coaches at the POS (Allow this product for "Philippine National Sports Team" Athlete's Discount). |
| Solo Parent | Tick if the product can get the solo parent discount at the POS. |
| Chinese Name | A second name, printed on documents that show it and searchable in product selectors. |
| Management Type | How stock of this product is tracked: Normal, Serial Number, Batch or Serial Number - No Tracking. See Management types. |
| Default Unit | The unit stock is counted in, for example PC or KG (required). All stock figures are in this unit. |
| Secondary Unit | A second unit you often use, for example BOX. You choose it from the units on the Unit tab. |
| Default Package Unit | The pack unit whose package price is shown by default, chosen from the units on the Unit tab. |
| Brand | The product's brand (required). Used in filters, rankings and the brand promoter report. |
| Product Life Cycle | Introduction, Growth, Maturity or Decline. For your own filtering and reports; it doesn't change how the product behaves. |
| Description | A longer description. |
| Default Barcode / Secondary Barcode | The main barcodes, chosen from the barcodes on the Barcode tab. If the product has no barcode, CIRMS generates one when you save. |
| Category | The product's category (required). Click … to pick it from the category tree. The parent category comes from the category. |
| Vatable | Tick if VAT applies (VAT); unticked products are NON-VAT. |
Supplier
The suppliers you buy this product from, one row each.
| Column | What it's for |
|---|---|
| Default | Tick for the main supplier. Only one row can be the default; it is the product's supplier in lists and reports. |
| Supplier | The supplier. |
| Purchase Price | This supplier's price per default unit. The button Apply Supplier Purchase Price copies it to the Purchase Price of every branch on the Price tab (branches that copy from another branch follow automatically). |
| Discount 1 – Discount 4 | The supplier's discounts in %, applied one after the other. |
| Supplier SKU | The supplier's own code for the product, printed on purchase orders. |
| MOQ Unit / MOQ Qty / MOQ Inc. Qty | The supplier's minimum order: the unit you must order in, the smallest quantity, and the step above it (for example at least 10 boxes, then in steps of 5). For your buyers' reference. |
| Order Lead Time | How many days the supplier takes to deliver, for your buyers' reference. |
Unit
Units other than the default unit, and how many default units each contains.
| Column | What it's for |
|---|---|
| UOM | The unit, for example BOX or CASE (from Data › UOM). |
| Qty | How many default units are in one of this unit. Example: default unit PC, unit BOX with Qty 24. When you sell 2 BOX, stock goes down by 48 PC. |
| Length, Width, Height, Weight | The size and weight of one of this unit, for shipping and e-commerce. |
Barcode
Every barcode that should find this product, one per row, with the UOM it stands for and a Memo. Scanning a unit's barcode in a transaction enters the product in that unit, so the box barcode enters 1 BOX. A barcode can belong to one product only.
Price
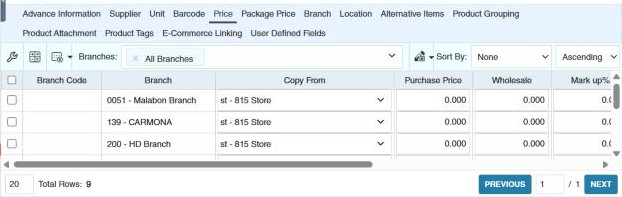
One row per branch, with that branch's prices per default unit. Use the Branches filter to show only some branches.
| Column | What it's for |
|---|---|
| Branch Code / Branch | The branch. |
| Copy From | Makes this branch use another branch's prices. Choose the branch to follow; its prices are copied here whenever they change. Leave it empty to give the branch its own prices. |
| Purchase Price | The cost used for this branch (needs the permission to see costs). Click the calculator to open Purchase Price Computation: enter the Gross Amount, up to four discounts, an Adjustment, a Markup and a Multiplier, and CIRMS works out the price. |
| Apply Cost | Writes this branch's purchase price into the product's lines on every transaction of the branch between two dates. Use it to correct the cost of past transactions after a price mistake. |
| Wholesale / Wholesale Qty | The wholesale price, and the quantity from which the POS uses it (For POS use only). Example: retail 12.00, wholesale 10.50 from 12 pieces: a POS customer buying 12 pieces pays 10.50 each. |
| Retail / Mark up% | The normal selling price, and its markup over the purchase price. |
| Price A – Price E | Five more price levels. Customers can be set to buy at one of them (on the customer or customer group). |
| Editable | Whether users of this branch may change its prices (users signed in to the main branch can always change them). See the setting on branch price editing below. |
The button Update Cost Price to All Transaction in Date Range for All Branches does the same as Apply Cost for all branches at once.
When you save, CIRMS warns about abnormal prices (for example a cost higher than the retail price) if your administrator has switched the pricing abnormality warning on.
Data › Product › Update Product Prices to change selling prices, and Data › Product › Update Product Cost to change the purchase price.
Package Price
Prices when the product is sold by the pack, for example a pack of 6 cans sold as one item. One row per branch and pack unit:
| Column | What it's for |
|---|---|
| Branch / Branch Area | The branch and its area. |
| Active | Whether this pack price is used in the branch. |
| UOM(Pack) / Unit Specs | The pack unit and how many default units it holds. |
| Purchase Price, Wholesale, Retail | The prices for one pack. |
Pack prices are used at the POS (For POS use only). If a pack's purchase price is higher than its wholesale or retail price, CIRMS warns you when you save (when the pricing abnormality warning is on).
Branch
| Column | What it's for |
|---|---|
| Active | Whether the branch carries the product. Users signed in to a branch where the product isn't active don't see it in that branch's product lists and selectors. |
| Remarks | A note for this branch, shown as Branch Remarks in the list and some reports. |
| Sync to POS | Whether the product is sent to this branch's POS terminals. Untick it for products the POS shouldn't sell, such as raw materials. |
Location
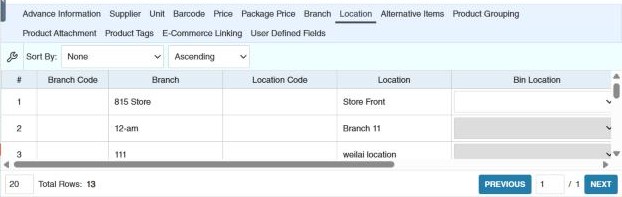
One row per branch location (for example Store and Warehouse):
| Column | What it's for |
|---|---|
| Location Code / Location | The location. |
| Bin Location | The shelf or bin where the product is kept, printed on picking lists. |
| Copy From | Makes this location use another location's Min and Max. |
| Min / Max | The lowest and highest stock you want. CIRMS uses them for the product inventory warning report, the maximum-stock warning on incoming transactions and the minimum-stock warning on outgoing ones. Example: Min 24, Max 120: when stock falls to 20, the product appears in the warning report with a suggested order of 100. |
Alternative Items
Products to offer instead when this one is out of stock. Click Product Selector and pick them; the list shows each one's Barcode, Stock No., Name, Chinese Name and Description.
Product Grouping
Makes this product a group made of other products (its components), for example a gift basket made of 3 items, or a 1 kg pack cut from a 25 kg sack.
- Choose the type in Grouping: None, Manual Group, Manual Ungroup, Automatic Group, Automatic Ungroup, Automatic Group Inventory or Automatic Ungroup Inventory.
- Click Product Selector and pick the components.
- Enter each component's Qty per one group product. For Automatic Ungroup the quantity is a percentage; Automatic Ungroup Inventory allows only one component.
Each type moves stock differently. What each one does, when to use it and a sample transaction are in Product grouping types.
Once the product has been used in a transaction, Already Transacted is shown and only manual groups can still be changed. A product that is itself a component shows Component and lists the groups it belongs to. A group can't be a component of another group.
Product Attachment
Photos and files. Click Upload to add them; they appear under Attachments. Set as Primary makes a photo the Default Image (the one shown in the product list's Image column and in reports), and Remove deletes it.
Product Tags
Tags from Data › Product Tag, for grouping products your own way (for example "Christmas items" or "Imported"). Lists and reports can be filtered by tag.
E-Commerce Linking
Links the product to its listing on an online store: choose the E-Commerce API (your store connection) and enter the Platform Product SKU or Platform Product Name. See Product Linking Management.
User Defined Fields
Extra fields your company has added to products. Shown only if there are any. See User-defined fields.
Stock figures
The product list, product selector and reports use these figures:
| Figure | Meaning |
|---|---|
| Inventory | Stock on hand now, from all approved transactions. |
| Reserved Qty | Quantity promised to go out: on approved sales, purchase returns, damages, stock deliveries and stock returns that aren't fully shipped yet. |
| Avail. Inv | Inventory minus Reserved Qty: what you can still promise. |
| Requested Qty | Quantity expected to come in: on approved purchase orders, sales returns and stock requests not fully received yet. |
| Projected Inventory | Avail. Inv plus Requested Qty: what you'll have once everything pending is done. |
Example. Inventory 100, a sales order of 30 not yet delivered, a purchase order of 50 not yet received: reserved 30, available 70, requested 50, projected 120.
The Product Summary
Click a product's underlined Inventory in the product list, or in a transaction's product line, to open its Product Summary. Choose Another Product switches to another product. The tabs are:
| Tab | What it shows |
|---|---|
| Transaction Summary | The product's stock movements for a period, per transaction type (Purchase Inbound, Sales Outbound, POS Sales, Adjustment Increase…), from the Beginning stock to the ending Inventory, with the transactions behind each figure. |
| Inventory Stock Card | The stock card: each movement in order with Pre Inventory, Post Inventory, Pre Average Cost and Post Average Cost. Use it to see how the moving average cost changed. |
| Batch | For batch products: each batch with its Remaining Pc Qty, Expiration Date and dates. |
| Serial Number | For serial products: the serial numbers in stock, per branch and location. Export Serial Number exports them. |
| Pending Trans Summary | The approved transactions behind Reserved Qty and Requested Qty, with Delivered Qty and Remaining Qty. |
| Supplier | Each supplier's last Purchase Inbound Qty, Price and Purchase Inbound Date. |
| Monthly Sales | Quantity, average price and amount sold per month, back office and POS separately. |
| Deliveries to Branch | Quantities delivered to each branch and location. |
| Inventory by Branch | Current stock in each branch and location. |
How to update many products from Excel
- In the product list, click Update Product Details.
- Choose the Purpose, for example Update Prices, Update Barcode, Update Units, Update Location (min/max and bin), Update Suppliers, Update Grouping, Update Tags or Delete Product.
- Choose Update Based On (Stock No., Barcode or Product Name): the column CIRMS uses to find each product.
- Download the Excel Template, fill it in and click Upload File.
- Check the results in View Logs: rows that couldn't be updated are listed with the reason.
Example. To raise the retail price of 300 products in every branch, choose Update Prices, download the template, fill in the stock numbers and new prices, and upload it.
To add new products from Excel, use Import the same way.
Settings that affect this module
Your administrator can change these in Settings (see About settings). Click a section to see the choices.
Generic Settings › Income Statement
Generic Settings › Inventory Adjust
Generic Settings › Product Pricing
- Restrict branches to only be able to view their own price
- Show pricing abnormality warnings?
- Markup% computation basis
- Select the Branch that will be set as the default branch to Copy Branch Price From
- Select the Location that will be set as the default location to Copy Min and Max From
- Display main branch cost in other branches?
- Set default type for auto rounding computation.
- Set base amount for rounding computation. (cents)
- Auto Compute Product Grouping Price
- Make Branch Price to be Editable (This will ignore 'Copy From' & 'Editable' restriction)
- Set other branches product price "Copy From" value to NONE
- Set branches' price if editable by themselves or not.
- Apply product price in all branches upon saving product input?
- Apply product MIN and MAX in all branch's locations upon saving product input?
Generic Settings › Product
- Enable Sorting Feature in Product List
- Enable auto display of total Row Count of Product in Product List, will cause slow down in loading if enabled
- Allow product name searching to ignore special characters?
- Allow deletion of Products with non-zero inventory?
- Set filename format for feature "Download Product Image" output file
Generic Settings › Purchase Inbound
- Auto-update Product's Purchase Price after approving of Transaction
- Auto input product Quantity and UOM base on History?
Generic Settings › Purchase
Generic Settings › Sales and Other Income
Generic Settings › Sales Outbound
- Update customer's historical price if product price is updated.
- Auto select product batch during transaction saving if none is selected
Generic Settings › Sales Return Inbound
Generic Settings › Security
Generic Settings › Stock Delivery Outbound
Other permissions for this module
| Permission | Allows you to |
|---|---|
| Data › Product › Update Information | Change product details |
| Data › Product › Delete | Delete products |
| Data › Product › Import Excel | Import products from Excel |
| Data › Product › Show Cost | See product costs |
| Data › Product › Barcode Print | Print barcodes |
| Data › Product › View Product Summary | Open the product summary |