User
Every person who logs in to CIRMS or the POS needs a user account. The account's permissions decide which menus and buttons they see, per branch.
Menu: Data › User
How to add a user
-
Open Data › User and click ⊕.
-
On the User Information tab, fill in:
Field What to enter User Code A short code. Username / Password The login details (required). Full Name The user's name (required). License Key The license key assigned to this user (required). POS Passcode Click GENERATE PASSCODE to create a passcode for POS login. Status Tick Active. Mobile No., Telephone No., E-mail Address, Position, Address, Memo Optional details. Assign as Salesman for Following Branches Choose the branches where this user can be picked as a Salesman. Login Time Schedule The days and hours (Start / End) the user may log in. Enable Authenticator Administrators only. Tick to require two-factor verification at login. CIRMS shows the Key and a QR Code for the user to add to their authenticator app (Regenerate Key makes a new one). (Send E-mail) Feature › Login Credentials The Username and App Password of the e-mail account CIRMS uses when this user e-mails a transaction (✉ on approved purchase and sales transactions). 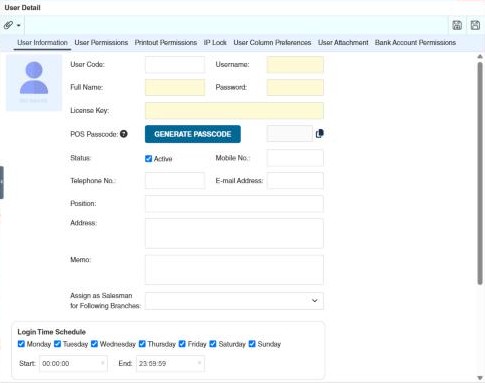
-
Set the user's permissions (see below).
-
Click 💾 (Save).
How to set a user's permissions
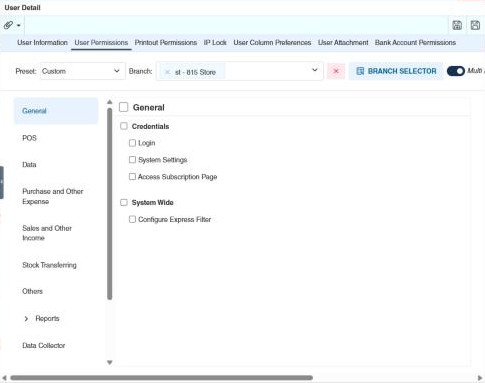
Permissions are set per branch: a user can be a cashier in one store and a supervisor in another. Open the User Permissions tab and choose a Preset:
| Preset | How the permissions are set |
|---|---|
| Custom | You tick the permissions yourself. Choose the Branch (or several with Branch Selector) and tick. Single Select Mode / Multi Select Mode: Switch "Selection Type Mode". In Single Selection mode, users can apply different sets of user permissions per branch. In Multi Selection mode, users can bulk apply a sets of user permissions in a group of branches |
| Role | The user gets the permissions of a Role for the chosen branches, and follows the role when it changes. Modify Permission changes the role's permissions, for every user with that role. |
| Template | Copies a role's permissions once as a starting point: choose the Template and click Apply Template, then adjust the ticks. Later changes to the role don't affect this user. |
| Copy From User | Copies another user's permissions once: choose the User and click Copy Permissions. |
In the list of permissions, the left side lists the sections (Data, Purchase and Other Expense, and so on) and the right side each module in that section with its permissions. Tick a module or section heading to select everything under it. Click 💾 (Save) when done.
Throughout this guide, each task shows the permission it needs in the form Section › Module › Permission, matching this screen.
Example. A new cashier, Liza, works only at Store 2. The administrator creates her user, sets Preset to Role with the role Cashier for Store 2, and saves. When the company later lets cashiers print barcodes, the administrator uses Modify Permission once and every cashier gets it.
The other tabs
| Tab | What it's for |
|---|---|
| Printout Permissions | Which printout templates the user may print with, per section and module. For example, tick only the official receipt template for Sales Outbound so the user can't print with the draft template. |
| IP Lock | The only computers (Allowed IP Address) this user can sign in from. Allow to all IP Addresses if record is empty. Type an address and click ✔ to add it. |
| User Column Preferences | The columns this user sees by default in each report (Reports). Tick the columns per report; the user starts with these instead of the standard columns. |
| User Attachment | Files about the user, such as an ID photo or contract. Upload, Set as Primary (Default Image) and Remove work as on a product. |
| Bank Account Permissions | Which bank accounts the user can use in payments, collections and bank transactions: click a bank on the left and tick its accounts. |
Settings that affect this module
Your administrator can change these in Settings (see About settings). Click a section to see the choices.
Generic Settings › Security
Other permissions for this module
| Permission | Allows you to |
|---|---|
| Data › User › Update | Change users and their permissions |
| Data › User › Delete | Delete users |